by Mayumi-H | Apr 19, 2018 | It's My Life, Short Stories
Recently, I took part in a flash fiction writing challenge, the #WriteFightGIFClub’s #PhotoStoryPrompt, from writer and Twitter user Radina Valova. Challengers are encouraged to use the photo to inspire a flash fiction piece while adhering to some very basic criteria. Here was this particular prompt:
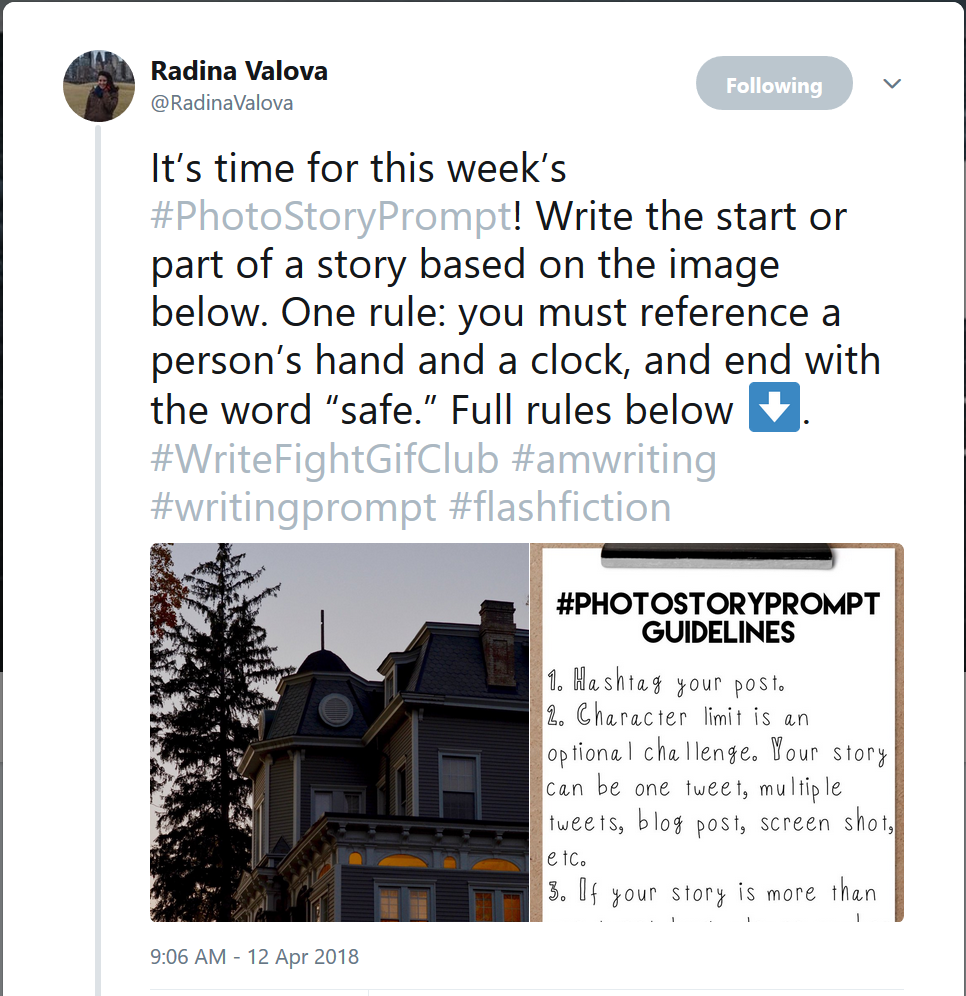
When I see a flash fiction/writing prompt challenge, I give myself five minutes to find my idea. If I don’t hit on an idea within five minutes, I move on. I think prompts like this one can be great for kick-starting the story-writing process, but I’ve already got a few works-in-progress I’m working on! For this prompt, an idea did come immediately to mind:
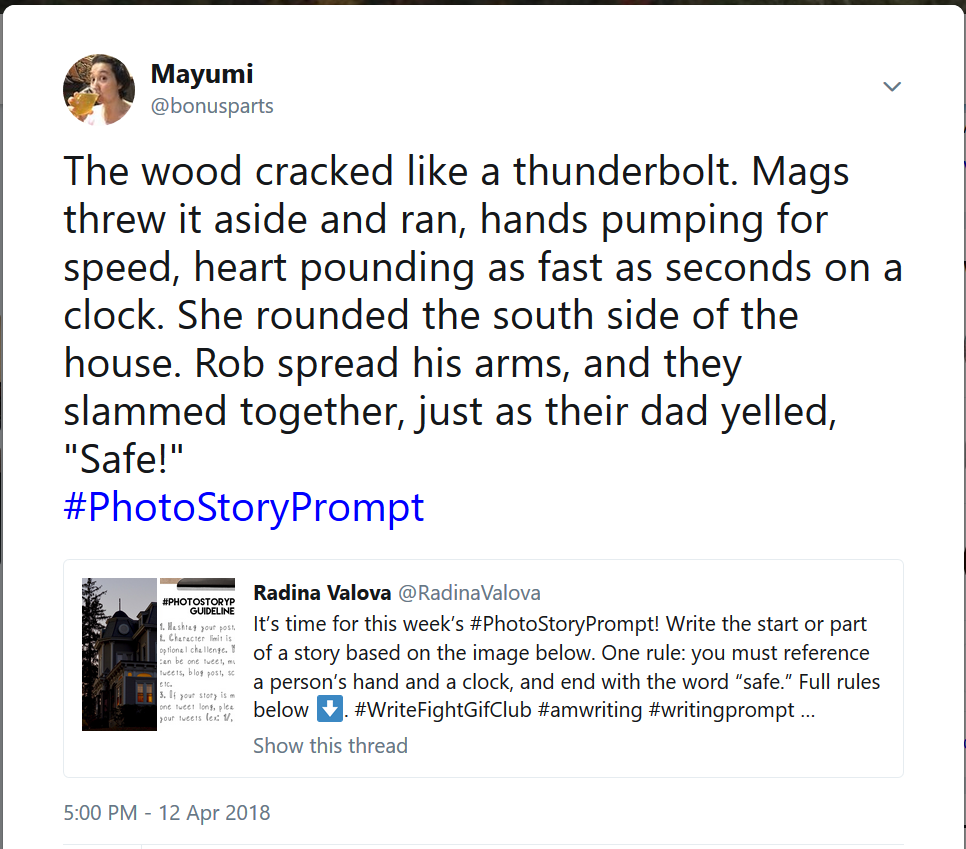
Longtime followers should recognize Maggie and Rob from my “Finding Mister Wright” series of slice-of-life stories. If you enjoyed the story, maybe you’ll click “Like” at the end of this post. When you “like” something on a blog like this one, everyone else who comes to this page sees that you did. If you’re on Twitter, if you click “like” on (or “heart”) a Tweet, all of your followers see that you liked it in their own timeline. That’s kind of obnoxious, but I’ll show you a way to stop those “likes” from potentially cluttering up your timeline.
Let’s say you follow a lot of people on Twitter, and those people love to click “like”. What happens is that your own timeline starts to fill up with all of those different “likes”. That can be overwhelming, but here are some steps to keep it under control. Keep in mind that these steps will unilaterally disable likes from a person, so be careful for whom you use them.
Step 1: Click on the down-arrow to the far-right of the Twitter user’s handle/name. You’ll open a drop-down box that looks like this:
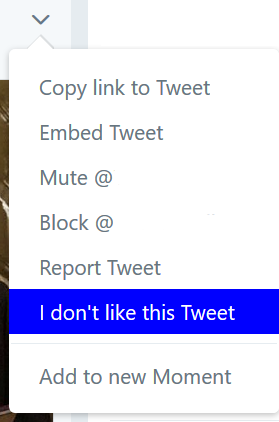
Select “I don’t like this Tweet”, to go to the next step.
Step 2: Click on the option that best fits your desire: either Show fewer likes from a user, or Show fewer Tweets from the person they “liked” or retweeted. I’ve blanked out the usernames from this example so I don’t make anybody feel bad. 🙂
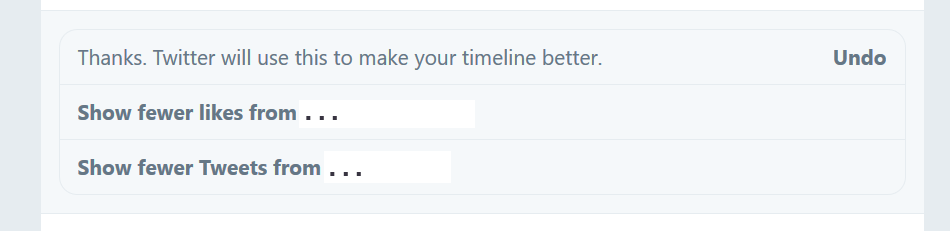
Step 3: Once you decide on your choice, you should get the following notification in your timeline:

Remember, this basically turns off ALL likes from that particular user. So, if you want to keep abreast of some of their likes, you’re stuck with all of them. At least until I figure out the next step to share with you!
Did you like my post on Liking in Twitter? How about my flash fiction story? If you’d “like” to participate in the #PhotoStoryPrompt short fiction exercise, head over to Twitter and check it out. There’s a new one every Thursday!
by Mayumi-H | Sep 1, 2012 | Uncategorized
Everybody knows how to schedule, right? You don’t? You mean, you sit at your computer and write all your posts “live”? You finish typing and you hit that “Publish” button right away? Well, have I got news for you: Scheduling is your friend.
Scheduling your WordPress posts allows you to coordinate your updates to be published and distributed automatically, at your convenience, without you having to sit there on a sunny Friday afternoon or whatever, just to meet a deadline. You can write up your posts well in advance (you can even keep a stash of posts ready to go), and keep your free time to yourself. Now, who doesn’t want that?
Don’t know how to Schedule? Don’t worry; we’ll go over it in a few very simple steps.
Step 1. Write your post as you normally would – proofread it, make it all nice and pretty, assign it to the right Categories and give it the proper Tags – but don’t hit that nice blue Publish button quite yet. Instead, look where it says “Publish immediately Edit”:

Step 2. Click “Edit.” A box with the current date and time will open up:

As you can see, the “current” time corresponds to the “Publish immediately” command. If you were to press that “Publish” button right now, your post would be published at the current time (a.k.a., immediately).
But that’s not what we want to do.
Step 3. Change the date and/or time to your preferred Schedule update time. For example, I like to set my posts to publish at 5:00am (my local time, which happens to be Eastern Time, or GMT -4:00), on Mondays, Wednesdays, and Saturdays. For our example, I’ll change this publish Schedule to September 1, 2012, at 5:00 am:

Note: WordPress defaults to 24-hour time (sometimes referred to as “military time”). This won’t affect your scheduling if you want to publish between 1:00am and 12:59pm, but some people aren’t familiar with the 24-hour clock. For a quick reference guide and explanation, check out this simple conversion chart: http://www.mathsisfun.com/time.html
Step 4. Once you’re settled on your Scheduled date and time, click the “OK” button (do not click “Publish”).
Once you click “OK,” you’ll notice that, where the blue button used to say, “Publish”, it now says “Schedule”:

Step 5. Now, you can click “Schedule.” This will move your post from the Draft collection to the Scheduled (or to-be-published) bin.

WordPress will take care of the rest: my post is now Scheduled for publishing on 09-Sep 1, 2012 @ 05:00. (Rather, it was published on September 1, 2012, at 5:00am ET. But, since I wrote this in advance, more than a week before its publishing date, I’m talking about it in the future. Timey-wimey, you know.)
[youtube http://www.youtube.com/watch?v=vY_Ry8J_jdw&w=420&h=315]
Hopefully, you’ve found this guide to Scheduling with WordPress helpful. If you weren’t already a master scheduler, consider yourself one, now. 🙂


Recent Comments